Tuesday, January 31, 2012

Chicken Tortilla Soup

Alright, I've kept you in suspense long enough, I guess; and I have a few spare minutes.  So, here is one of the recipes I cooked up last weekend to stock my freezer with.


Chicken tortilla soup.  It's super easy and fun, and always tastes better the next day (hence the perfect freezer recipe).

Here is what I did.  But, first I'll show you all the ingredients.  They were hidden the Kroger bags on the last post.


First you must cook your chicken.  And when you boil your chicken, you will most likely end up with a bunch of chicken broth.  This is a good thing, especially for this recipe.


I ended up with a lot more than I needed, but that's ok.  It'll go into the fridge or freezer for another recipe.


Skim the fat off of the broth and pour 6 cups into your pot.  After I took this picture, it dawned on me that I should use a bigger spoon to skim off the fat.  It was a brilliant moment, and the process went so much faster.


Next, slice up your onion, green bell pepper and garlic and put them in the pot with the broth. 


Cook the veggies until they are soft.


The pot looks very big.  But it's just an optical illusion.


Meanwhile, shred up your chicken.  I used two chicken breasts and two chicken thighs.


Then, in went the chicken with the veggies.  The onions were beginning to get translucent.


Now, this is where it got really complicated (and colorful).  Add a can of diced tomatoes, tomatoes with green chilies, corn, black beans and pinto beans. 


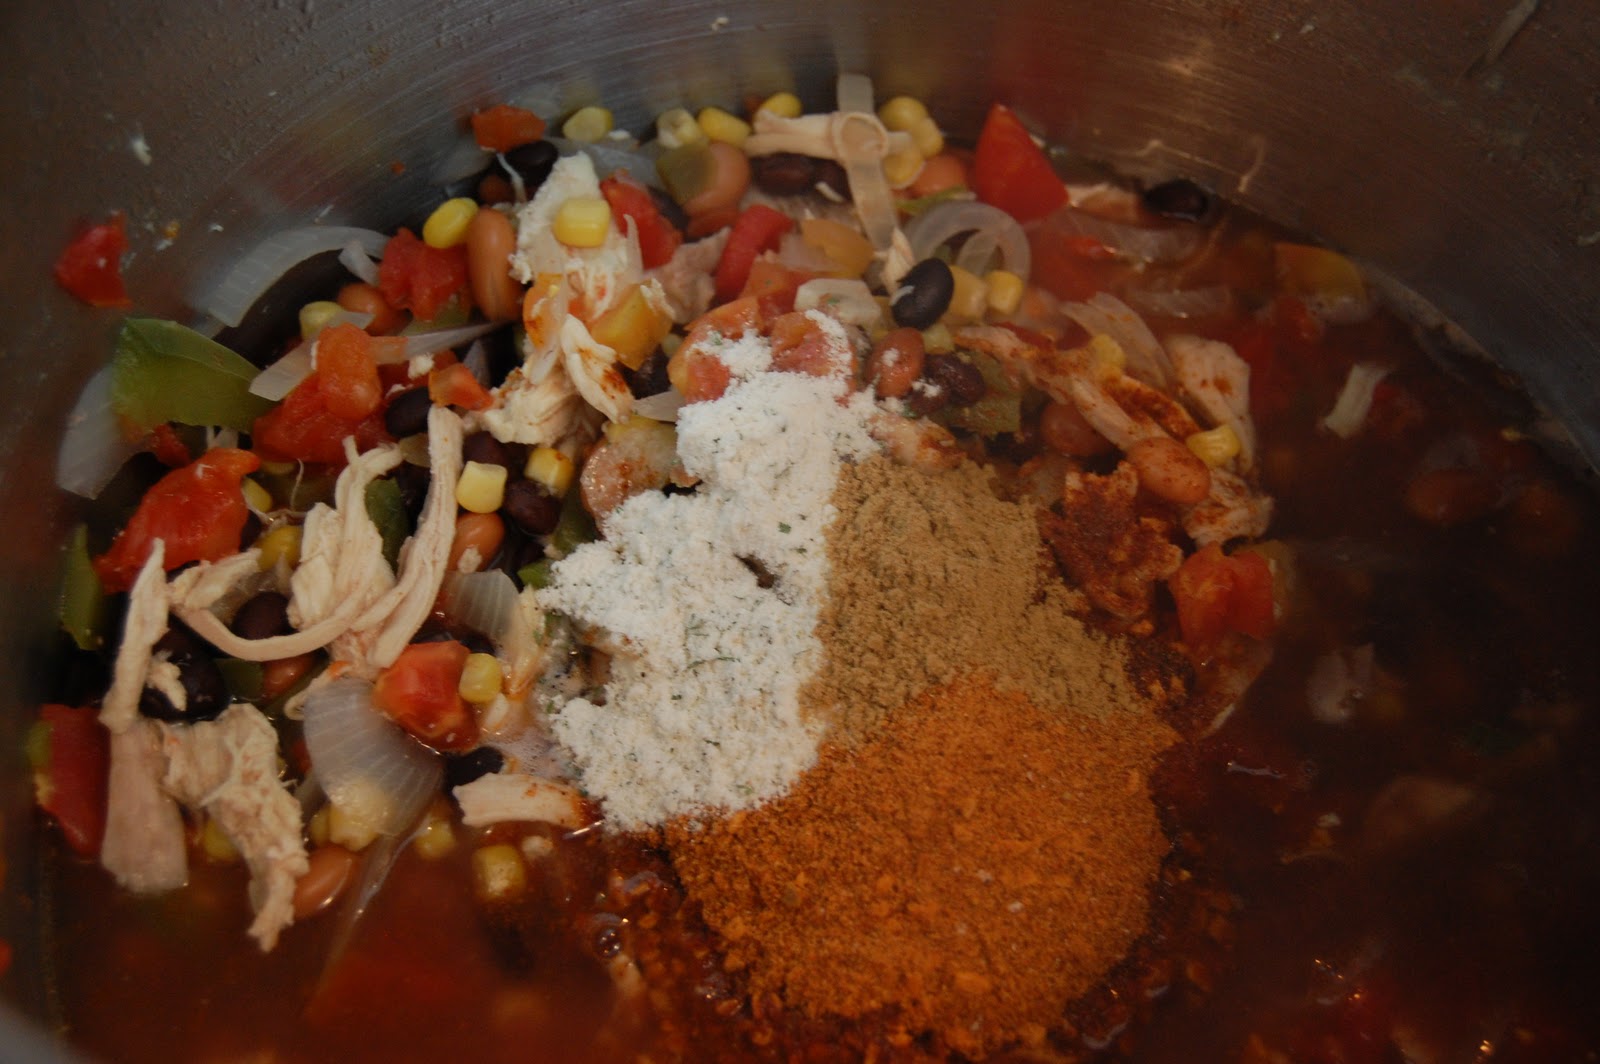
Finally, stir it all up and add a package of taco seasoning, some cumin and about teaspoon or so of ranch dressing mix.  Let it cook for a while so the flavors and meld together.


Then, enjoy!  You should definitely serve this with chips, sour cream, cheese, and maybe a slice of avocado.  But, if you have none of the above (or you're just really hungry), it's yummy all by itself.

So, here is what when into my freezer.  I divided the soup into amounts that were about two to three servings, because let's be honest, if I froze it all together, I'd be eating it until the end of busy season (and that's if it didn't go bad before then!) :)  Ok, maybe not that long....


Here's the recipe!

Taco Soup with Chicken or Beef 

1 lb. of boned chicken breast 
5-6 cups of chicken broth, defatted 
1 onion, chopped 
1 green pepper, chopped 
1 t. garlic salt, if needed
1 (15 oz.) can diced tomatoes 
1 (10 oz.) can tomatoes with green chilies 
1 clove garlic, minced 
1 (15 oz.) can pinto beans, drained 
1 (15 oz.) can black beans drained 
1 (15 oz.) can creamed corn (I used regular above) 
1 to 1 ½ (1.2 oz.) package of taco seasoning 
½ teaspoon cumin 
1 (1/6 oz.) package dry ranch dressing mix 

In soup pot, cook chicken breast.  Remove chicken and cool; cut in small pieces.  Measure out broth and add onion, green pepper and garlic to pot; cook, covered, until veggies are tender.  Return chicken to broth and add tomatoes, garlic, beans, corn, taco seasoning, cumin and ranch dressing mix.  Stir together and simmer, covered for 20 minutes.  To serve, place tortilla chips in bowl and ladle soup over chips


Saturday, January 28, 2012

Freezer Cooking and PB&B

Ok, I know I haven't posted in over a week!  Busy season is upon me at work.  So, today, I cooked up several recipes to freeze for those busy days.  I will post them soon and keep you in suspense until then!

Here I was today ready to cook.


And here were my groceries.


After I cooked, I was too tired to eat any of it, believe it or not!

So, I made a peanut butter and banana sandwich.  Super yummy.  Super comforting.  Super simple.


Thursday, January 19, 2012

Strawberry Cake

I should be packing for my trip this weekend, but I wanted to tell you about a cake that will, in the words of my friend, "make you want to slap your momma."  I like cake, in case you couldn't tell from my earlier post, but this one is my favorite, and in my opinion, takes the cake... uh, I mean, tops them all.


This is strawberry cake is made with real strawberries.  I used to not like strawberry cake at all before I tasted this one.  Ever since, I've been a strawberry cake enthusiast, and it's the cake that I've chosen for my birthday and other special occasions for the past several years.  In fact, I made this cake last weekend for my birthday.  The original recipe is from "The Cake Mix Doctor" cookbook, but I've made a few adjustments to it.


Here are most of the ingredients.  Pretend that the strawberry jello below is also in the picture above.


This recipe is so easy, because all you do is mash up the strawberries and mix all the ingredients together.  The original recipe calls for fresh strawberries.  But, as you might guess, fresh strawberries are hard to come by in January when my birthday always hits (fancy it always is in January!).  So, to remedy this problem, I use whole frozen berries and let them thaw a little bit before mashing.


Now, this is a three layer cake.  So, you have to make two recipes to get three good size layers.  The fourth layer will freeze nicely wrapped in saran wrap and inside a freezer bag.


After the layers are baked and cooled, it's time for the icing that, you guessed it, also has strawberries in it.  It's a basic cream cheese frosting with coconut, pecans and mashed strawberries.


Cream the butter and cream cheese, then add the sugar and strawberries.  After it is well incorporated, add the pecans and coconut. 


The icing may be thin, so you can add a bit more sugar, if you feel that it's needed.


You can see that the cake started to split on the top. You can avoid this by shaving off the round top on the middle layer.


OR.... you can cover it all up with icing and no one will ever know.  It will make it extra yummy because there is more icing inside the top layer.


Then, when you get to this point, you should be sure you have a cup of coffee to enjoy the cake with.


And it is inevitable, my plate is always scraped clean. 

I hope you enjoy the recipe.  And perhaps it'll make you a strawberry cake enthusiast, too!

Here the recipe...


Strawberry Cake 
(this recipe will make two layers)
1 white cake mix
1 small pkg. strawberry gelatin
1 cup of mashed strawberries (1 1/2 cups whole)
1/2 cup whole milk
1 cup vegetable oil   
4 eggs

Blend everything in mixer on low for one minute. Then at medium speed for 2 minutes. Bake at 350 for 28-30 in well greased round pans.


Strawberry Icing

(one recipe is enough for a three layer cake)

8 oz. cream cheese at room temp.
1 stick of butter at room temp.
3 1/2 cups of powdered sugar
3/4 cup mashed strawberries, well drained  (1 cup whole)
1/2 cup coconut
1/2 cup chopped pecans 

Combine cream cheese and butter for 30 seconds on low. Add sugar and strawberries till sugar is incorporated on low for 1 minute. Then medium speed until well mixed. Fold in pecans and coconut.


Tuesday, January 17, 2012

Stromboli

I have a weakness for pizza.  Really, I do.  I'm not sure where it came from; perhaps it developed when I was young and my parents always made homemade pizza for us.  It was an event when we made pizza.  We would spend our Friday evening making the dough, chopping veggies, shredding the cheese, cooking the meat, and finally enjoying the finished product.  My dad was a pizza master, and his love for making it rubbed off on me.

Stromboli, though, recently entered my life via my mom's friend.  She brought it to a party, and it was such a fun party food that was simple to make, but looked great.  Aren't those the best party foods?


Stromboli has lots of delicious crust (let's admit it, we all love bread a lot) wrapped around all the yummy traditional pizza toppings.  Here's a step-by-step of making stromboli.


First, we'll begin with making the dough.  This recipe is from a cookbook my parents have had for years.  The pages are worn and stained from all the years of use.


It's a wonderful recipe that can be made by hand or mixed up in the mixer.  I prefer to use modern conveniences and use the mixer to mix the dough up.  The first step is to mix the brown sugar into warm water and dissolve the yeast into the water and let it activate.


Here it is right after mixing the yeast into the water.  It'll get frothy over the next five minutes.


Meanwhile, we'll measure the flour into the mixing bowl and add the olive oil and salt.


Here's the yeast... see, I told you it would get nice and frothy.  Now, dump that into the mixing bowl with the flour.  The yeast will give it that wonderful flavor that has a hint of sweetness from the brown sugar.


Mix the ingredients with the dough hook for a few minutes until it is well combined and starts to come together.


After the dough comes together, place the dough into a clean bowl.  Rub olive oil in the bowl before placing the dough in it to help it not stick.


Drizzle a little olive oil on top.  Cover with a clean towel and set in a warm place to rise for a while.  I'm not sure how long exactly.  Maybe 30 minutes if your in a hurry like I was.  Or you can go and clean your house and let it get maybe triple in size.  Well, it may not triple, but it should double.  I didn't get a picture of the dough after it had risen, because we were all very hungry and ready to eat!

I doubled the dough recipe, so I used about a third of the dough for one stromboli.  However, I would use about half of the dough if you don't double the recipe.

Roll the dough into a rectangle on a cookie sheet so that's it's about a quarter or half an inch thick. 


Next, sprinkle onion and garlic powder on the bottom.  Here, I used an Italian blend without salt.  Then, spread your sauce down the middle of your dough.  As you can see, I used Prego.  Add some fennel seed.  It adds a special flavor that most restaurants add, but is often left out at home.  Place your meat and veggies on top of your sauce.  Next, your cheese.

The great thing about homemade pizza is you can use whatever toppings you want.  Don't like mushrooms?  No problem; just leave them off.  Love them?  Saute them, and it's even more delicious.  Have you ever tried roasting your bell peppers before placing them on your pizza?  Try it.  It will knock your socks off.  Just leave out the anchovies, please.


This is where it gets a bit complicated.  We are going to braid the dough over the top.  Never good at braiding your doll's hair?  That's ok, because we're only going to work with one piece of dough at a time.  Cut the dough into strips on either side of your toppings.  You just need to be sure to make the same number of cuts on either side.


Then, cut out the corners of dough and fold the ends up.  I've got one side folded up and the other is ready to go.  


I snuck in some veggies.  Actually, this is a different stromboli that had orange bell peppers and red onion.  Yum! But, here is the detail of how the "fingers" of dough will be braided.  Just pull one over, then one from the other side.  Go back and forth, alternating sides.


The finished product will look like this before going into the oven. You can brush egg on top to give it a nice glossy finish before adding parmesan cheese or you can just add the cheese by itself.


Bake at 350 for about 35 minutes or until golden brown on top (and the extra flour on the cookie sheet is brown).


Cut into strips and serve with warm pizza sauce (or Prego, if you're me).  Take this to your Super Bowl party and enjoy!

Pizza Dough

4 cups all purpose flour
1 teaspoon salt
4 tablespoons olive oil, divided
2 packages (2 tablespoons) dry yeast
1 1/2 cups water
2 teaspoons brown sugar

Measure 1/2 cup warm water in a measuring cup and stir in the brown sugar.  Dissolve the yeast into the water and sugar.  Be sure the water is only warm; if it is too warm, it will kill the yeast and it won't activate.  Let the mixture stand for about 5 minutes until it is frothy.

Meanwhile add 4 cups of flour to the mixing bowl with the salt, 3 tablespoons of olive oil and 1 cup warm water.  When the yeast mixture is ready, add it to the bowl.  Mix the dough until it is well combined.

Rub a clean bowl with the remaining olive oil and place the dough in the bowl.  Drizzle olive oil on top, cover with a dish towel, and let it rise in a warm place until it is double in size.


Stromboli

Pizza dough
Garlic and/or onion powder
Fennel seed
Your favorite pizza toppings

When the dough is ready, roll out into a rectangle on a cookie sheet.  If the dough is sticky, add extra flour to help the dough not stick to the cookie sheet.

Season the crust with garlic and onion powder and fennel seed.  Place your favorate pizza toppings in the middle.

Cut the dough into strips on either side of the toppings.  Cut out the corners, and fold the dough up on both ends.  Next, braid the strips of dough across the top.  Top with parmesan cheese and additional seasoning, if desired.

Bake at 350 for 35 minutes or until top is golden brown.  Cut into strips and serve with warm pizza sauce for dipping.

Saturday, January 7, 2012

Really Good.

What is it about a really moist, dense cake that is so good?  It must be because there is so much sugar, oil (or butter), and eggs packed in there.


That's what this cake is.  It's really good.  And for being really good, you might think that it is overly complicated.  But, let me tell you, it's amazing what you can do with a cheap box cake mix and a few other ingredients.


It's called Chocolate Chip Cake.  I got the recipe from a friend several years ago and have enjoyed making it ever since.  The secret of the cake is the two boxes of pudding and the whole bag of chocolate chips that go into it (and maybe the oil and eggs!).  But, as we all know, chocolate and peanut butter go together like peaches and cream or pumpkin and chocolate.  ("Really", you say to yourself, "pumpkin and chocolate go together?"  Yes, they do; we'll talk about that later.)  So, when is there a better opportunity to combine chocolate and peanut butter than now... in a cake?  I jumped at the chance to combine the two, and exchanged the chocolate chips for a bag of Reese's peanut butter chips.  It was well worth it.  Another great option is to use dark chocolate chunks.  This will satisfy any craving for a rich chocolate treat. 


I took this cake to a party last night.  I rushed home from work to get this cake mixed up and in the oven in an effort to make it to the party on time.  The cake takes 50 minutes or so to bake, and I had just enough time to make it and get to the party with what I knew would be a cake that was still warm from the oven.  But, to my chagrin, the cake took way longer to bake (because I had something else in the oven at the same time...).  So, when the cake was finally done, I plopped it onto the cake plate and carried a very warm cake to my car and went the party.  In my rush, I forgot to get a final picture of it, and I of course didn't have my camera there.  But, thanks to instagram (Who needs a real camera, anyway?  Well, never mind.), I snapped one at the party.  The cake was yummy and worth the extra baking time!

Once the cake is finished baking and has cooled, you can garnish with a light dusting of powdered sugar or chocolate ganache (although, it's great by itself, too!).  Don't be like me and put in on when the cake is still very warm!  But, this wasn't the first time I've garnished the cake when it was still warm, and I live to tell you that the world won't end if you do.


Here's the recipe... enjoy!

Chocolate Chip Cake

1 yellow cake mix
1 4 oz. box of vanilla pudding
1 4oz. box of chocolate pudding
4 eggs
1 cup oil
1 cup water
1 bag chocolate chips or peanut butter chips

Mix first six ingredients until combined scraping down sides as needed.  Then, add the chocolate chips.  Pour into a well greased bundt pan and bake at 350 for 50-55 minutes.  Cool in pan for 10 minutes and then remove to serving plate.  Dust with powdered sugar or other desired topping.